16 September 2020

best brownie recipe

Chewy fudgy homemade brownies made completely from scratch. Try them with chocolate frosting and sprinkles on top! You will never make a box mix again, trust me.

Ingredients:

  • 1/2 cup (115g) salted butter
  • 8 ounces (228g) coarsely chopped quality semi-sweet chocolate
  • 1-1,5 tablespoons instant coffee 
  • 2/4 cup (100g) granulated sugar
  • 1/4 cup (50g) packed light brown sugar
  • 3 large eggs
  • 1 teaspoon vanilla extract
  • 1/2 cup + 2 Tablespoons (80g) all-purpose flour (measure this accurately)
  • 2 Tablespoons (11g) unsweetened cocoa powder
  • 1/4 teaspoon salt
  • 100 gr pecan nuts
  • 1 cup (180g) semi-sweet chocolate chips (optional)
This recipe 25 minutes, depending on how big the tin is.
1,5 times the recipe = 29 minuts baking for soft and moist brownies
2 times the recipe = 35 minutes for soft and moist brownies

Directions:

  1. Melt the butter and chopped chocolate in a medium saucepan on medium heat, stirring constantly, about 5 minutes. Or melt in a medium microwave safe bowl in 20 second increments, stirring after each, in the microwave. Remove from the heat, pour into a large mixing bowl, and allow to slightly cool for 10 minutes.
  2. Ad a tray of nuts in the oven and preheat it to 175C degrees. Bake the nuts till fragrant. 
  3. Whisk the granulated and brown sugars into the cooled chocolate/butter mixture. Add the eggs, one at a time, whisking until smooth after each addition. Whisk in the vanilla. Gently fold in the flour, cocoa powder, and salt. Once combined, fold in the pecan nuts.
  4. Pour batter into the prepared baking pan and bake for 29-35 minutes or until the brownies begin to pull away from the edges of the pan. A toothpick inserted in the center should come out with only a few moist crumbs when the brownies are done. All ovens are different, so keep an eye on them after 30 minutes and use the toothpick test to see when yours are finished.
  5. Allow the brownies to cool completely in the pan set on a wire rack. Once cooled, lift the foil out of the pan using the overhang on the sides and cut into squares. For neat squares, I use a very sharp knife and wipe it clean with a paper towel after each cut.
  6. The brownies will stay fresh in an airtight container at room temperature for 1 week.
  7. Make ahead tip: For longer storage, these brownies (both frosted and unfrosted) freeze well for up to 2-3 months. Thaw overnight in the refrigerator before serving.

Additional Notes:

  1. I love to use salted butter here. If you choose to use unsalted, don't increase the salt in the recipe. I find that there is no noticeable taste difference between using salted and unsalted butter in this particular recipe.
  2. I typically use Baker's, Ghirardelli, or Trader Joes chocolate. Try using bittersweet chocolate for a deeper, darker flavor.
  3. You can use an 11x7 inch baking pan instead - the bake time is about 35-40 minutes.

17 November 2015

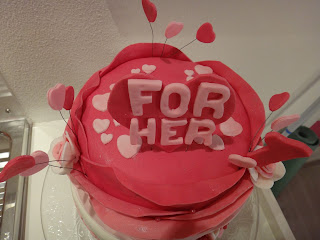
Hart for Her 1st anniversary cake

My friend Patricia asked me to make a cake for the 1st anniversary of her women only gym and gave me a carte blanche. She was confident that I would come up with something nice. Actually nice is not something I would go for when I make a cake for someone. I'm always going for the WOW effect. 

I have to admit that I was a bit stressed. It's been a while since I last made a cake so I was hopping that I didn't lost my touch. Luckily it's just as riding a bike. 

A couple of days before I started to look online for inspiration. I found some really pretty cakes but I still had no idea what I would design for the cake. Since the gym color is fuchsia I would of course use that color. I though that some shades of pink and white would be nice for a cake. 

The day before the party I started making some crème pâtissière using this recipe:
- 500 ml milk
- 100 gr sugar
- 2 egg yolks
- 32 gr custard powder
- vanilla pot/essence/sugar
- pinch of salt

While the crème pâtissière cooled down I baked the biscuit for the bottom and top layer. For the bottom layer I used:
- 300 gr eggs
- 150 gr sugar
- 130 gr flour
- pinch of salt
- lemon zest

oven temperature 170C
And for the top layer I used:
- 200 gr eggs
- 100 gr sugar
- 50 gr flour
- 20 gr coco powder
- 3 teaspoons of coffee powder
- pinch of salt
 
While the biscuit cooled I made some butter cream:
- 128 gr water
- 338 gr sugar
- 150 gr egg white
- pinch of cream of tartar
- 750 gr room temperature butter in cubes
- 200 gr melted dark chocolate

I divided the butter cream in three portions. One portion I kept plain, one was used to make chocolate butter cream and the other portion was turned into some apricot butter cream.

I started with the bottom layer first. After I cut the biscuit in three layers, I spread some crème pâtissière on each layer to keep the biscuit moist. Then a layer of apricot jam, a layer of crème pâtissière and a layer of apricot butter cream. This was the filling for all the layers of biscuit. After that I crumble coat the biscuit and put it in the fridge to harden. 

Now it was time for the top layer. Again I spread some crème pâtissière on each layer, then some raspberry jam, some more crème pâtissière and some chocolate butter cream. I used some chocolate butter cream to crumble coat the biscuit and when that hardens I spread an extra layer of plain butter cream. If I wanted to coat it with some white fondant, the butter cream will not shine through. 


Now for the fun part. What shall I do with the cake decorations. I didn't want to make a "jump in your face" pink cake. I wanted something more then that. To keep the bottom part from being too busy I covered it with some white fondant. I love ombre cakes and I always wanted to make one so I used some pink fondant to make some fuchsia fondant by adding pink color. Then I used three different sizes heart shaped cutters to cut out the hearts. I did the same with a piece of different pink fondant. The idea was to use the different sized hearts to cover the cake all up. I started with a layer of fuchsia hearts and after adding a layer of pink hearts I decided to not cover it all up. As the top layer would be "in your face" I wanted to keep the bottom layer less busy. To give it more glam I added some mini sugar pearls in between the hearts. After all this I put the cake in the fridge.
In the meantime I used some of the left over hearts by turning them into balloons. I used some water to clue two hearts together and added a piece of wire in between. 
I also made some pink roses and cut out the letters for the gym. Instead of cutting out the letters "hart" I cut a heart out of fondant and put the letters "for her" on it. 
Now it was time to decorate the top layer. I wanted to try and see if I could make a pink ombre rose. I wanted to go from fuchsia to light pink so I had to cover the biscuit with a fuchsia fondant. As I didn't had enough left I had to make more and luckily I manage to get the same color as before. To that fuchsia fondant I started adding more white fondant to get the lighter shade. Layer for layer I clued all the different shades of pink pedestals with some water.
Because I was missing some decorations on the top of the cake I cut out some hearts and arranged that according to a pattern I had on a stencil. Then on the overlap of the pedestals I added a fuchsia sugar pearl. 
The next day I used some of my silver dust to give the pedestals a little shine. I also added the flowers.
At the gym I put the two cakes together and used some of the heart balloons to make it extra festive.

It's great to start a cake with no concrete idea and then to come up with something like this. Patricia and her guests loved it so mission accomplished!

07 August 2015

Desserts to go

I just can't believe how fast this year went. I remembered when I first started this course in September and now it's already finished and things have turned back to normal. 

The last two school days were for us to prepare for the competition. The assignment was to make up your own company and design a menu or an assortment list. This list has to include five items from which you'll have to actually make one. Anything that we've learned in the past year could be used.

My company would be a dessert bar named "My mini Bites". And this is my menu:

My Mini Bites dessert bar menu
“There is always room for dessert”


Death by chocolate:
chocolate cheesecake
chocolate lava cake

One apple a day:
- apple crumble pie
- cinnamon bavarois with apple confetti

Just a lemon tree:
- lemon curd pie
- lemon cake bar  

Don't be blueberry
- blueberry tartelet
- blueberry crumble

On a stick:
- red velvet cake pops
- tiramisu pops

Classics to go:
- carrot cake
- upside down pineapple cake
- Schwarzwalder kirsch cake
- no bake strawberry/cherry cheesecake

As I didn't want to make it too easy for myself I wanted to make the "classics to go". My desserts should be portable so you could bring it home and enjoy, either by yourself or with someone else. And if you couldn't finish it in one go, you could easy store it for the next day. I had plenty of Nutella jars which had a lit so these were perfect for this. I would use the ingredients needed for the desserts and layer them in the jar so that it would look nice.

I worked out the recipes and made a mise and place plan. Since we had two days I divided the work I had in "need to make now" and "can make later". I figured I had to make the things that would take more time first and on the last day I would only make the stuff that couldn't be prepared upfront. 

So my to do list for day one was:
- make carrot cake
- make coconut biscuit
- make chocolate biscuit
- make cookies
- make cherry cremeux

On the day of the competition (day two) I had to make:
- crème pâtissière
- cherry and strawberry quark
- caramelized nuts
- cherry whipped cream
- caramelized pineapple
- cream cheese frosting

I came at around 9 am that day so I could start early. I stared with making the carrot cake using this recipe:
- 1 cup flour
- 1 teaspoon baking powder
- 1/4 teaspoon salt
- 1 teaspoon cinnamon
- 1/4 teaspoon nutmeg
- 3 tablespoons dried coconut
- 1/4 teaspoon ginger powder
- 1/2 cup sugar
- 1/2 cup + 2 tablespoons oil
- 2 eggs
- 1,5 cup grated carrots
- 1/2 cup pecan nuts
- 1/4 cup raisins
Oven temperature 175C 

I mixed the oil with the sugar and eggs. Then I shifted the flour with the baking powder, the salt, cinnamon, nutmeg and ginger powder and mix that with the oil. Then I incorporated the carrot, coconut, nuts and raisins and spread the mixture on a baking tray. I baked it for about 20 minutes and used a cookie cutter to cut out circles so they could fit in the jars. Then I left them to cool.

Then for the upside down pineapple cake I used the recipe for a biscuit, but this time for a tropical feel I added some dried coconut:
- 300 gr eggs
- 150 gr sugar
- 100 gr flour
- 50 gr dried coconut
- splash of coconut/pineapple liqueur
- pinch of salt
oven temperature 170C

I started with heating up the eggs and sugar till about 40C. Then I mix this on high till the mixture was light yellow and tripled in volume. In the end I added a splash of liqueur and   carefully incorporated the flour, salt and coconut. I spread this mixture out on a baking tray and baked it till it was done. I also  used a cookie cutter to cut out circles and let them cool. 

For the Schwarzwalder Kirch dessert I wanted to make a chocolate biscuit using this recipe:
- 200 gr dark chocolate
- 125 gr butter
- 3 eggs separated in whites and yolks
- 125 brown sugar
- 80 gr self rising flour
- 50 gr almond flour
- pinch of salt
oven temperature 200C

I started with melting the butter and the chocolate. In the meantime I mixed the egg whites with 100 gr sugar till stiff peaks. I mixed the rest of the sugar with the egg yolks and mixed this in with the chocolate mixture. To this I incorporated the flour, salt and almond flour. Last I incorporated the egg whites and spread this mixture on a baking tray and baked it till it was done. Again I cut out circles with a cookie cutter and let them cool.

The last part of the baking was the cookie bottom for the non bake cherry/strawberry cheese cake. This recipe is pretty straight forward as all I did was mix all the ingredients together and bake till in a muffin tin till it was golden:
- 100 gr flour
- 50 gr almond flour
- 100 gr butter
- 50 gr sugar
- 2 tablespoons of dried coconut
- 1/2 egg
oven temperature 180C

The last thing I had to do now was making the cherry cremeux. I used:
- 350 gr cherry puree
- 120 gr egg yolk
- 120 gr sugar
- 5 gr gelatin powder (soaked in 25 gr Kirch liqueur)
- 100 gr butter

I heated the cherry puree with 60 grams of sugar and added the soaked gelatin. I mixed the egg yolk with 60 grams of sugar and heated it for about 5 minutes on 85C and then I added the butter. I combined both mixtures and poured it in a mold so I could freeze it. 

It was a crazy first day but I manage to get everything on the list done. Everything was wrapped, packed and ready for the freezer so I could start putting things together on the competition day.

The week after I had a ton of work to do before I had to present the desserts to the judges. It was very helpful to have a to do list. So I just started with making some crème pâtissière using the same recipe:
- 500 ml milk
- 100 gr sugar
- 2 egg yolks
- 35 gr custard powder
- vanilla sugar
- 50 gr dried coconut
- pinch of salt

While this cools off I cubed some fresh strawberries and soaked them in some strawberry liqueur. I also cubed some fresh pineapple as well. Part of it I soaked with some pineapple/coconut liquor and the other part I caramelized in a pan with some butter and sugar. Since I had quite some caramelized pineapple I put some in a blender to make some pineapple puree.

I wanted to start with the dessert that needs the most time to set so I stared with the cherry and strawberry no bake cheese cake (quark). For this I used:
- 500 gr quark
- 200 ml whipping cream
- 100 gr sugar
- 16 gr gelatin powder (soaked in 80 gram water)
- vanilla sugar
- 50 ml cherry puree
- 50 ml strawberry puree

I whipped the cream with the sugar till it was as thick as yogurt. I dissolved the gelatin in some hot cherry juice and let it cool for a bit. I mixed the gelatin with the quark and carefully mixed this with the whipped cream. To half of this mixture I added the cherry puree and to the other half the strawberry puree. Since the quark will set I had to pip everything in the jar. 
I started with putting some of the cubes of strawberries in liquor on the bottom of the jar. On this I placed the cookie and the strawberry quark followed by a piece of coconut biscuit and topped it with the cherry quark. I decorated it with some fresh strawberries and cherries. One dessert down, three more to go. 

Now it was time for some caramelized nuts. I love pecan nuts so I used those:
- 200 gr pecan nuts (already roasted in the oven for more flavor)
- 60 gr butter
- 100 gr sugar

I put the sugar in a pan and let it melt till it has a nice golden color. Then I added the butter and when that was well mixed I added the nuts. I made sure the caramel coated most of the nuts before I poured it on a baking tray so it could cool. After they cooled I kept the pretty ones whole and chopped the rest in smaller and bigger pieces.
Now it was time to put together the Schwarzwalder Kirch dessert. I had to make the chocolate mouse and the cherry whipped cream. I started with the cherry whipped cream. I used:
- 2 gr gelatin (soaked in 10 gr Kirch liquer)
- 200  ml whipping cream
- 1 tablespoon sugar
- 100 gr cherries

I dissolved the gelatin in some hot cherry juice and let it cool a bit till it starts to thicken a bit. In the meantime I whipped the whipping cream with the sugar till it was as thick as yogurt. To this I mixed in the gelatin and the cherries. I had to pour this in the jars before it was too thick so I stared with some cherry cream on the bottom of the jar. On top of that I added a piece of cherry cremeux and topped it with a piece of chocolate biscuit. On this I sprinkled some caramelize nuts.

Now for the chocolate mouse I used:
- 110 gr whipping cream
- 2 egg yolks
- 30 gr sugar
- 180 gr dark chocolate
- 375 gr whipping cream

I heated 110 ml whipping cream with 10 grams of sugar. The other 20 grams of sugar I mixed with the egg yolks. I add both mixtures together and cooked it till it thickens. To this I added the chocolate and let it melt and cool a bit. The 375 gram whipping cream was whipped till it has a yogurt thickness and I used it to incorporate it with the chocolate mixture. I piped this in the jars, added some sliced cherries and let it set.
Two more desserts to go. 

Now it was time for the carrot cake dessert. I had to make some cream cheese frosting. One of my class mates had this recipe and she told me it was very good so I decided to give it a try:
- 500 gr powdered sugar
- 150 gr butter
- 250 gr mascarpone cheese

I mixed the powdered sugar with the butter till it was light and fluffy and then mixed in the mascarpone. Then it has to be mixed till it was light and airy. 

Now I could put together the carrot cake dessert. On the bottom I put some crème pâtissière then a piece of carrot cake. I spread a thin layer of pineapple puree on the carrot cake to keep it moist and added another layer of crème pâtissière and carrot cake with a layer of pineapple puree. Then I sprinkled some caramelize nuts, covered it with some cream cheese frosting, added another piece of carrot cake and ended with some more cream cheese frosting. For decoration I used some whole caramelized nuts and some chopped pieces.
For the last dessert, my upside down pineapple cake I wanted to make some butter cream. Luckily my class mate had some white chocolate butter cream left so I added some pieces of pineapple and some pineapple and coconut liqueur to get the butter cream I wanted to have.

I started with putting some pineapple marinated in liquor on the bottom of the jar. Then on top of that I put a piece of coconut biscuit, spread it with some pineapple puree and added some caramelized pineapple pieces. Then I put in some butter cream, topped it with some more coconut biscuit, butter cream and coconut biscuit and I topped it with some cream cheese frosting. For decoration I used a piece of fresh pineapple and some chopped caramelize nuts.
I had a slightly different idea of putting the desserts together but in the heat of the moment I forgot and this is what I ended up with. I manage to make four very tasty desserts and well in time for the judges to do a taste test. 

Although I didn't win the competition, I was very pleased with the results. It has been a great year, with lots of first times. I've learned a lot and I enjoyed every moment of it. The sky is the limit!

26 July 2015

Molecular gastronomy

On this last day we got to experiment with all kinds of different powders. We started with a mini masterclass explaining what powder had what usage and how to use them.
I've always loved those pop in your mouth little juicy spheres so we decided to make them using a cantaloupe melon. First we had to clean the melon and make a puree which we had to strain to get a clear juice. To this we added some powdered sodium alginate and dripped it into a bowl filled with a cold solution of calcium chloride. After a couple of seconds we scooped the spheres out and rinsed them off in water. It was a lot of fun to make them, but it tasted really band. Next time I would add more flavor so it will be tastier. 
Then we decided to make egg on toast using some of the techniques that been shown to use. The egg white is made of whipped cream, but we wanted to make it with some coconut cream. The yolk is made with mango puree.

First we started with making the egg yolk. We mixed some mango puree with some gluco powder and to that we added a bit of xanthana powder. We dripped this mixture in a bath of water and alginate powder and rinsed it off with some water.
Then it was time for the egg whites.We heated the coconut cream with some sugar till about 70C. Then added some Kappa powder and cooked it on 70C for a little bit. With a spoon we scooped some coconut cream on a silicone mat and immediately added the egg yolks on top. Now that the eggs were ready we baked the slices of brioche bread with some sugar and cinnamon and placed the baked egg on top. Then we decorated it with some melon caviar. 
They looked so real! I would love to experiment more with different flavors and techniques. 

I can't believe we are already at the end of the school year. As I though this phase had 5 lessons as well I was a bit confused to hear that the week after we would start with our preparation of the end of the year competition! We had till Sunday to send in our list of ingredients so I was late. Luckily I got some extra time to send it in, so that was the first thing I did when I got home. Send out the list for the ingredients I needed for the stuff I would be making.

Liquid nitrogen

This is the start of the last couple of school days. We are now almost at the end of the journey. Again the group was divided in two. The group who were working down stairs were playing around with liquid nitrogen and the group upstairs were working with different powders doing all kinds of scientific stuff. 

My group started down stairs with liquid nitrogen. Fist we got an explanation of what it was, what it does and how to handle it (of course with lots of care!). Then the fun part started when they start dropping all kinds of stuff in the nitrogen and let us taste it. They also made some raspberry ice cream which was very tasty.

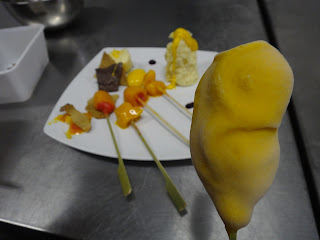
After that it was time for us to experiment a bit. The assignment was to make a little dessert plate and this is what we came up with in the end. We had a spongecake, fruit popsicles, a piece of Bros chocolate and some baked white chocolate.  We had all different idea's but non of them seem to work the way we planned. 
We used a Kidde (some kind of whipped cream dispenser) to make the spongecake. We basically made a cake batter, put it in the Kidde, add a gas charger and used it to fill a cup. We put the cup in the microwave and after a couple of seconds we had spongecake. We also tried to butter the cup first and then microwave the batter, but the results were horrible. The spongecake didn't came out right. We experimented a bit and only one spongecake came out the way we wanted.

Then with the same whipped cream dispenser we wanted to make a "Bros chocolate bar". First we had to mix the chocolate with some cocoa butter, temper it and fill the Kidde. We poured this mixture into a plastic bag and used a vacuum machine to make it bubbly. Unfortunately the chocolate didn't set and when it did it tasted horrible. Perhaps the cocoa butter was not good anymore. 

Then we tried to make ice cream using the nitrogen. Somehow this didn't work either since it turned out all sticky and glue like. 
The best part of the day was  when we made our own popsicle by dipping a piece of fruit and fruit purees it in the nitrogen.
I also dipped my popsicle in some piña colada  liqueur. Look how big my popsicle was!

One of my class mates wanted to make some baked white chocolate. The recipe was super easy. You melt some white chocolate, spread it on some non stick paper and stick it in an 170C oven till the edges starts to brown. This happens very fast so of course I burned one portion. The chocolate came out crunchy and so tasty. I bet it would go great with some vanilla ice cream. 

It was a day full of experiments. One other day to go before class ends.

25 July 2015

Woezel & Pip theme cake

There have been a lot of first times this past week. It started with making a 3D boat cake, creating a fondant sea, modeling parrots and octopuses. This time it was making a Woezel & Pip birthday cake for an one year old boy. His mom has seen this particular cake online and she wanted to have the same one. This kind of limited my creativity, but since she like the cake so much I just made it for her. At that time she didn't know it but of course I would give it my own little twist. Just to keep it more fun. 
She wanted a square cake for about 20 people with the name Alec and his age. For the biscuit and the stuffing she went for a lemon vanilla biscuit with fresh raspberries, raspberry jam crème pâtissière and chocolate butter cream. A very good choice I might say. 

For me a birthday cake is not a birthday cake if it's not at least two layers so instead of one big square cake I made two slightly smaller ones so I could stack them together. 

Two days before the birthday party I baked two biscuits. For the bottom tier (8 inch square pan) I used this recipe:
- 400 gr eggs
- 200 gr sugar
- 180 gr flour
- pinch of salt
- lemon zest


For the top tier (6 inch square baking tin) I used:
- 200 gr eggs
- 100 gr sugar
- 70 gr flour

- 20 gr cocoa powder
- pinch of salt
- lemon zest


Since we talked about either a chocolate or a vanilla lemon biscuit I decided to both 
as a surprise since I would have two tiers anyway.

I also made some crème pâtissière using this recipe:
- 500 ml milk
- 100 gr sugar
- 2 egg yolks
- 35 gr custard powder
- vanilla pot/
essence/sugar

The next day I started with making butter cream:
- 128 gr water
- 338 gr sugar
- 150 gr egg white
- pinch of cream of tartar
- 750 gr room temperature butter in cubes
- 200 gr melted dark chocolate


After the butter cream was ready I put half of it aside for crumble coating and to the other half I added the melted dark chocolate. 

Now it was time to cut and fill the cakes. I wanted to do the bottom layer first. I cut the cake in three pieces and I spread a layer of raspberry jam on each layer, then some crème pâtissière, stuck some fresh raspberries in it and covered it with a layer of chocolate butter cream. Then I used the plain butter cream to crumble coat the whole cake.  I did the same with the top layer. 
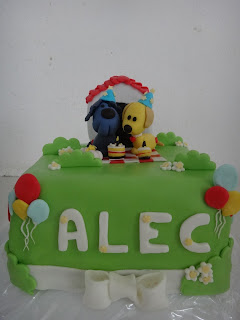
While the cakes were in the fridge I started modeling the two little dogs. It was quite difficult to get the color right and I wanted the color to be as close to the original as possible. Once I had the color I wanted I stared with making the bodies first. Then the tail and paws and last the heads and ears. Luckily I found a site online who had step by step pictures on how to model the dogs so I followed the steps and they turned out pretty cute. 
I also added my own little touch, a tiny heart on each dogs body!
I also made the balloons and stuck them on a piece of rice noodle. Uncooked spaghetti was a bit to yellow and to thick and these noodles were just perfect.  


As they were drying I made two mini birthday cakes including a candle, a bone wrapped in a ribbon and a picknick cloth. For the little house I used some brown chocolate fondant, modeled it and covered it with some white fondant. Then I used a wood textured mold to give it a wooden look. For the roofing tiles I stacked some heart shaped red fondant on top of each other.
Now it was time to cover the cakes with fondant. In the example cake they used blue fondant. As I would have two layers I decided to cover the top layer with some green fondant (Woezel & Pip are picknicking on the grass so green would be better then blue). The bottom layer was covered in blue since I want to at least keep as close to the original as possible. 

It took me three times to get the fondant on the top layer right. Now I know why I prefer round cakes. They are so much easier to cover!
I had no idea how to decorate the cake since the example had only one cake and I had two. I decided to make the top tier similar to the example and the bottom tier would be something from my own imagination. In the Woezel & Pip books and cartoons they use a lot of color. So first I worked on the edges of the cake. I used some green fondant so I kinda looked like grass. And I made a rainbow. This also helps to cover up some of the less pretty parts of the cake. 
Then I saw some butterflies online so butterflies it is. And in the picture there were clouds and flowers with faces and a cat. So I incorporated that all in this layer. Then I thought ladybugs, why not ladybugs who leave a trails so you can see where they have been. Ideas come to me out of the blue but mostly when I have some color fondant laying somewhere that I want to use so I make up a purpose for it. In this case I had some brown and red fondant so the perfect color for ladybugs.This layer is finished for now.
Time for the top layer. This was fairly simple since I had an example of how it should look like. I made a white ribbon on the bottom and made some bushes. To this I added some little white flowers. I placed the picknick cloth on top, the house in the back (I stuck it in the cake with two toothpicks) and the two dogs on the cloth with the cakes and the bone in front of them. Then I made little bushes with some white flowers. The example had a tree with fruit on it, but I didn't had enough room for that so I skipped it. I press out the letters for the name and place it on the frond. This layer is also finished for now. 
On the day of the birthday I had another look at the cake. I wasn't happy with the top layer since it was still missing some stuff. At firs I wanted to make a kite but then I changed plans and made a banner. This was suppose to cover the two sides in the back, but they looked so festive that I wrapped them around the cake. As the name was in the front I decided to make some more balloons to give it a finished look.
And I wanted to make some party hats for the dogs as well. I had some little stars so I used them to make the hats extra festive. 
Then I got the brilliant idea to use the stars on the bottom layer as well. Just to give it some extra dimension and to make it more fun.  

Sometimes you got to know when to stop and luckily I knew. A couple of hours later I delivered the cake while it was raining cats and dogs. I always put the cake together on the spot so nothing can happen to it in the meantime. I also added the age and the balloons to finish it.

Birthday boy's parents loved the cake so mission accomplished! Although she wanted a specific cake I gave her an one of a kind one made just for her birthday boy.