Showing posts with label birthday cake. Show all posts

17 November 2015

Hart for Her 1st anniversary cake

My friend Patricia asked me to make a cake for the 1st anniversary of her women only gym and gave me a carte blanche. She was confident that I would come up with something nice. Actually nice is not something I would go for when I make a cake for someone. I'm always going for the WOW effect. 

I have to admit that I was a bit stressed. It's been a while since I last made a cake so I was hopping that I didn't lost my touch. Luckily it's just as riding a bike. 

A couple of days before I started to look online for inspiration. I found some really pretty cakes but I still had no idea what I would design for the cake. Since the gym color is fuchsia I would of course use that color. I though that some shades of pink and white would be nice for a cake. 

The day before the party I started making some crème pâtissière using this recipe:
- 500 ml milk
- 100 gr sugar
- 2 egg yolks
- 32 gr custard powder
- vanilla pot/essence/sugar
- pinch of salt

While the crème pâtissière cooled down I baked the biscuit for the bottom and top layer. For the bottom layer I used:
- 300 gr eggs
- 150 gr sugar
- 130 gr flour
- pinch of salt
- lemon zest

oven temperature 170C
And for the top layer I used:
- 200 gr eggs
- 100 gr sugar
- 50 gr flour
- 20 gr coco powder
- 3 teaspoons of coffee powder
- pinch of salt
 
While the biscuit cooled I made some butter cream:
- 128 gr water
- 338 gr sugar
- 150 gr egg white
- pinch of cream of tartar
- 750 gr room temperature butter in cubes
- 200 gr melted dark chocolate

I divided the butter cream in three portions. One portion I kept plain, one was used to make chocolate butter cream and the other portion was turned into some apricot butter cream.

I started with the bottom layer first. After I cut the biscuit in three layers, I spread some crème pâtissière on each layer to keep the biscuit moist. Then a layer of apricot jam, a layer of crème pâtissière and a layer of apricot butter cream. This was the filling for all the layers of biscuit. After that I crumble coat the biscuit and put it in the fridge to harden. 

Now it was time for the top layer. Again I spread some crème pâtissière on each layer, then some raspberry jam, some more crème pâtissière and some chocolate butter cream. I used some chocolate butter cream to crumble coat the biscuit and when that hardens I spread an extra layer of plain butter cream. If I wanted to coat it with some white fondant, the butter cream will not shine through. 


Now for the fun part. What shall I do with the cake decorations. I didn't want to make a "jump in your face" pink cake. I wanted something more then that. To keep the bottom part from being too busy I covered it with some white fondant. I love ombre cakes and I always wanted to make one so I used some pink fondant to make some fuchsia fondant by adding pink color. Then I used three different sizes heart shaped cutters to cut out the hearts. I did the same with a piece of different pink fondant. The idea was to use the different sized hearts to cover the cake all up. I started with a layer of fuchsia hearts and after adding a layer of pink hearts I decided to not cover it all up. As the top layer would be "in your face" I wanted to keep the bottom layer less busy. To give it more glam I added some mini sugar pearls in between the hearts. After all this I put the cake in the fridge.
In the meantime I used some of the left over hearts by turning them into balloons. I used some water to clue two hearts together and added a piece of wire in between. 
I also made some pink roses and cut out the letters for the gym. Instead of cutting out the letters "hart" I cut a heart out of fondant and put the letters "for her" on it. 
Now it was time to decorate the top layer. I wanted to try and see if I could make a pink ombre rose. I wanted to go from fuchsia to light pink so I had to cover the biscuit with a fuchsia fondant. As I didn't had enough left I had to make more and luckily I manage to get the same color as before. To that fuchsia fondant I started adding more white fondant to get the lighter shade. Layer for layer I clued all the different shades of pink pedestals with some water.
Because I was missing some decorations on the top of the cake I cut out some hearts and arranged that according to a pattern I had on a stencil. Then on the overlap of the pedestals I added a fuchsia sugar pearl. 
The next day I used some of my silver dust to give the pedestals a little shine. I also added the flowers.
At the gym I put the two cakes together and used some of the heart balloons to make it extra festive.

It's great to start a cake with no concrete idea and then to come up with something like this. Patricia and her guests loved it so mission accomplished!

25 July 2015

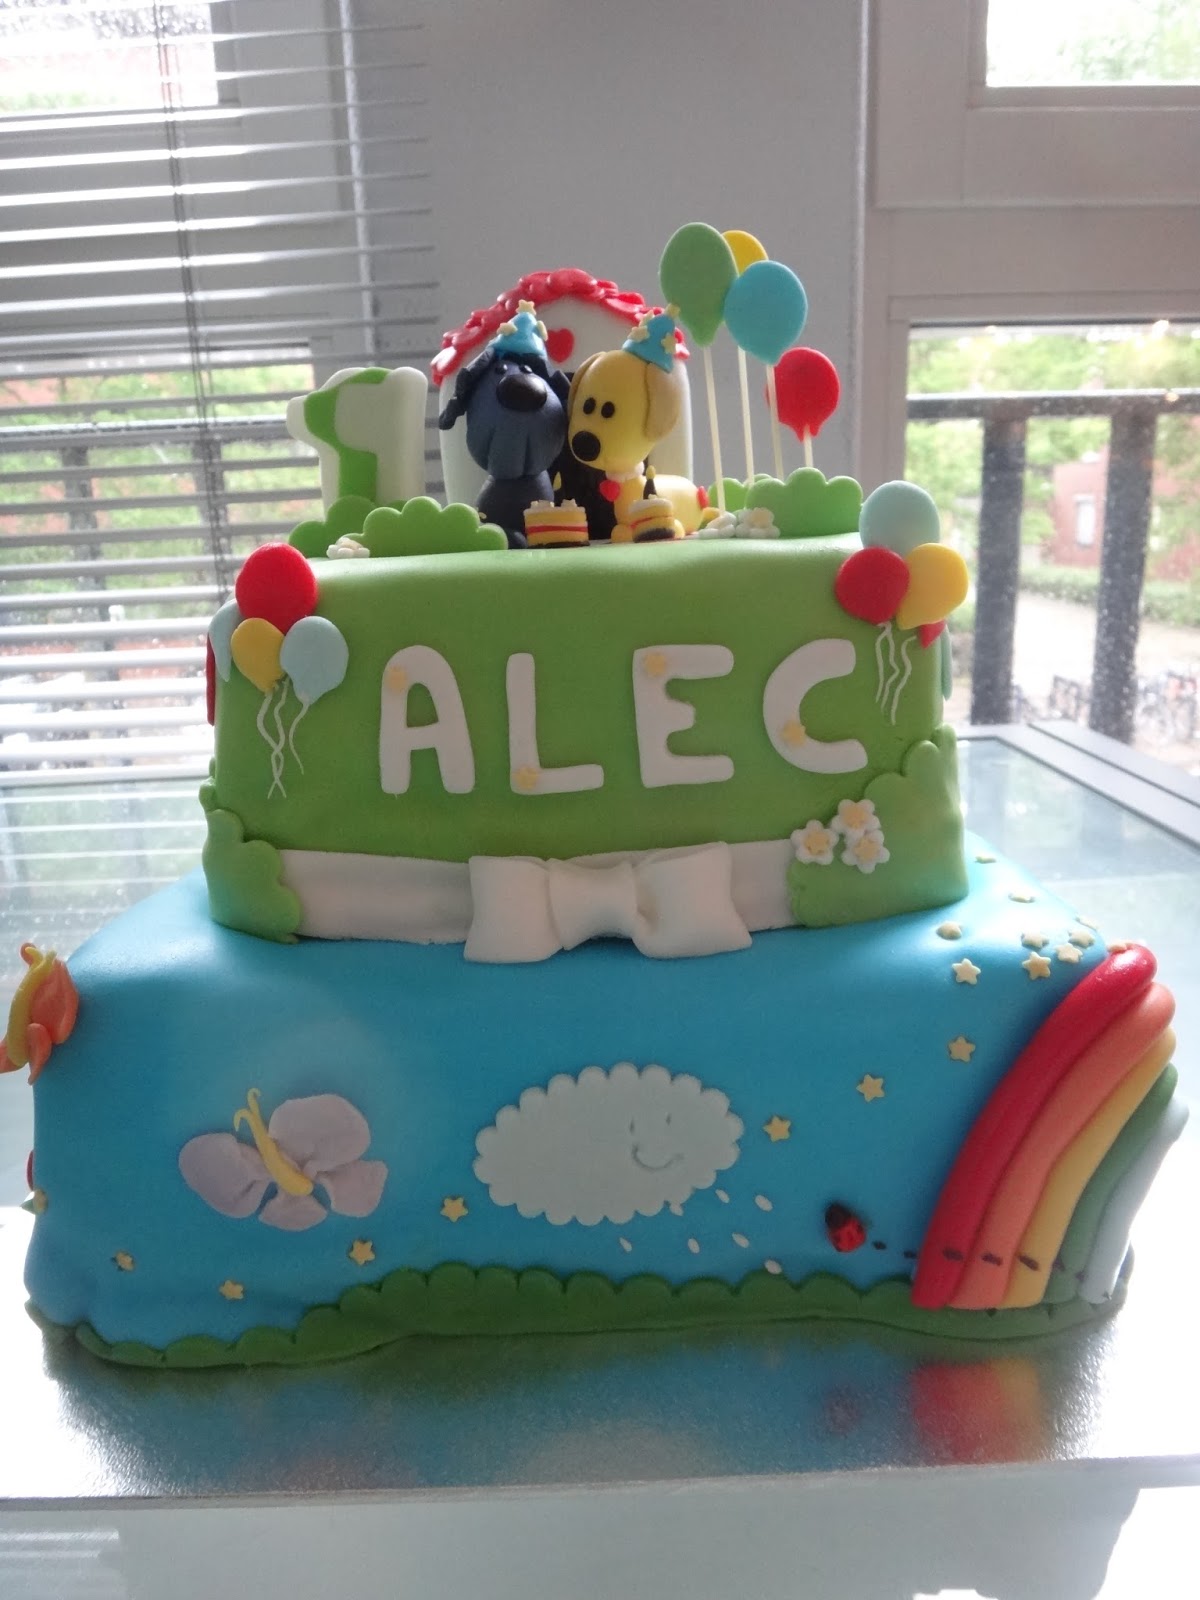
Woezel & Pip theme cake

There have been a lot of first times this past week. It started with making a 3D boat cake, creating a fondant sea, modeling parrots and octopuses. This time it was making a Woezel & Pip birthday cake for an one year old boy. His mom has seen this particular cake online and she wanted to have the same one. This kind of limited my creativity, but since she like the cake so much I just made it for her. At that time she didn't know it but of course I would give it my own little twist. Just to keep it more fun. 
She wanted a square cake for about 20 people with the name Alec and his age. For the biscuit and the stuffing she went for a lemon vanilla biscuit with fresh raspberries, raspberry jam crème pâtissière and chocolate butter cream. A very good choice I might say. 

For me a birthday cake is not a birthday cake if it's not at least two layers so instead of one big square cake I made two slightly smaller ones so I could stack them together. 

Two days before the birthday party I baked two biscuits. For the bottom tier (8 inch square pan) I used this recipe:
- 400 gr eggs
- 200 gr sugar
- 180 gr flour
- pinch of salt
- lemon zest


For the top tier (6 inch square baking tin) I used:
- 200 gr eggs
- 100 gr sugar
- 70 gr flour

- 20 gr cocoa powder
- pinch of salt
- lemon zest


Since we talked about either a chocolate or a vanilla lemon biscuit I decided to both 
as a surprise since I would have two tiers anyway.

I also made some crème pâtissière using this recipe:
- 500 ml milk
- 100 gr sugar
- 2 egg yolks
- 35 gr custard powder
- vanilla pot/
essence/sugar

The next day I started with making butter cream:
- 128 gr water
- 338 gr sugar
- 150 gr egg white
- pinch of cream of tartar
- 750 gr room temperature butter in cubes
- 200 gr melted dark chocolate


After the butter cream was ready I put half of it aside for crumble coating and to the other half I added the melted dark chocolate. 

Now it was time to cut and fill the cakes. I wanted to do the bottom layer first. I cut the cake in three pieces and I spread a layer of raspberry jam on each layer, then some crème pâtissière, stuck some fresh raspberries in it and covered it with a layer of chocolate butter cream. Then I used the plain butter cream to crumble coat the whole cake.  I did the same with the top layer. 
While the cakes were in the fridge I started modeling the two little dogs. It was quite difficult to get the color right and I wanted the color to be as close to the original as possible. Once I had the color I wanted I stared with making the bodies first. Then the tail and paws and last the heads and ears. Luckily I found a site online who had step by step pictures on how to model the dogs so I followed the steps and they turned out pretty cute. 
I also added my own little touch, a tiny heart on each dogs body!
I also made the balloons and stuck them on a piece of rice noodle. Uncooked spaghetti was a bit to yellow and to thick and these noodles were just perfect.  


As they were drying I made two mini birthday cakes including a candle, a bone wrapped in a ribbon and a picknick cloth. For the little house I used some brown chocolate fondant, modeled it and covered it with some white fondant. Then I used a wood textured mold to give it a wooden look. For the roofing tiles I stacked some heart shaped red fondant on top of each other.
Now it was time to cover the cakes with fondant. In the example cake they used blue fondant. As I would have two layers I decided to cover the top layer with some green fondant (Woezel & Pip are picknicking on the grass so green would be better then blue). The bottom layer was covered in blue since I want to at least keep as close to the original as possible. 

It took me three times to get the fondant on the top layer right. Now I know why I prefer round cakes. They are so much easier to cover!
I had no idea how to decorate the cake since the example had only one cake and I had two. I decided to make the top tier similar to the example and the bottom tier would be something from my own imagination. In the Woezel & Pip books and cartoons they use a lot of color. So first I worked on the edges of the cake. I used some green fondant so I kinda looked like grass. And I made a rainbow. This also helps to cover up some of the less pretty parts of the cake. 
Then I saw some butterflies online so butterflies it is. And in the picture there were clouds and flowers with faces and a cat. So I incorporated that all in this layer. Then I thought ladybugs, why not ladybugs who leave a trails so you can see where they have been. Ideas come to me out of the blue but mostly when I have some color fondant laying somewhere that I want to use so I make up a purpose for it. In this case I had some brown and red fondant so the perfect color for ladybugs.This layer is finished for now.
Time for the top layer. This was fairly simple since I had an example of how it should look like. I made a white ribbon on the bottom and made some bushes. To this I added some little white flowers. I placed the picknick cloth on top, the house in the back (I stuck it in the cake with two toothpicks) and the two dogs on the cloth with the cakes and the bone in front of them. Then I made little bushes with some white flowers. The example had a tree with fruit on it, but I didn't had enough room for that so I skipped it. I press out the letters for the name and place it on the frond. This layer is also finished for now. 
On the day of the birthday I had another look at the cake. I wasn't happy with the top layer since it was still missing some stuff. At firs I wanted to make a kite but then I changed plans and made a banner. This was suppose to cover the two sides in the back, but they looked so festive that I wrapped them around the cake. As the name was in the front I decided to make some more balloons to give it a finished look.
And I wanted to make some party hats for the dogs as well. I had some little stars so I used them to make the hats extra festive. 
Then I got the brilliant idea to use the stars on the bottom layer as well. Just to give it some extra dimension and to make it more fun.  

Sometimes you got to know when to stop and luckily I knew. A couple of hours later I delivered the cake while it was raining cats and dogs. I always put the cake together on the spot so nothing can happen to it in the meantime. I also added the age and the balloons to finish it.

Birthday boy's parents loved the cake so mission accomplished! Although she wanted a specific cake I gave her an one of a kind one made just for her birthday boy. 

19 July 2015

Jake and the Never Land Pirates theme cake

My neighbor approached me some weeks ago with the request of making the boys birthday cake. Since their birthday is in the same month they celebrate it together. The party theme was Jake and the Never Land Pirates. I have vaguely heard about this children's tv show, but never actually watch it so I had to look it up. I had no idea what to make but it had to be two cakes so they both can have their own. 
I came across this very cool 3D cake and I decided to go for it and make one for the boys. Two days before the party I started with baking the biscuits first. I started with baking two rectangular chocolate cakes using this biscuit recipe:
- 400 gr eggs
- 200 gr sugar
- 170 gr flour

- 30 gr cocoa powder
- pinch of salt
- lemon zest

oven temperature 170C

Then I baked two vanilla cakes. For the bottom cake I used:
- 300 gr eggs
- 150 gr sugar
- 130 gr flour
- pinch of salt
- lemon zest


And for the top tire I used:
- 200 gr eggs
- 100 gr sugar
- 70 gr flour
- pinch of salt
- lemon zest


While the cakes cooled I made some crème pâtissière using this recipe:
- 750 ml milk
- 150 gr sugar
- 3 egg yolks
- 50 gr custard powder
- vanilla pot/essence/sugar
- pinch of salt


Then the next day I made butter cream I using this recipe:
- 128 gr water
- 338 gr sugar
- 150 gr egg white
- pinch of cream of tartar
- 750 gr room temperature butter in cubes
- 200 gr melted dark chocolate

I put about half aside for crumb coating and to the other half I added some melted chocolate.

Because there wasn't enough I had to make  more:
- 85 gr water
- 225 gr sugar
- 100 gr egg white
- pinch of cream of tartar
- 500 gr room temperature butter in cubes

- handful small diced fresh strawberries
After all this mise and place the day before it was time to put the cake together. I started with the 3D boat first. I wanted to recreate Bucky, Jake's boat. I found a template online, but this boat wouldn't be big enough for 40 people so I carved the boat shape myself. I started with one, then put it on top of the other and carved out the second one. One sheet of biscuit would be the bottom, the other one will be used to shape the boat in height. Since the bottom was too thick to leave it like that and it was actually a bit too thin to fill it, I carefully slice it in half. I  sprayed it with some sugar syrup, spread some raspberry jam and crème pâtissière on it and on the other half I spread the chocolate butter cream.

Where possible I would fill the cake. On some places filling it would make it less stable so I would just use some butter cream. After that I crumble coated the cake and put it in the fridge. 

Then it was time for the two tire cake. I started with cutting them in three parts. After spraying all the parts with some sugar syrup I spread some raspberry jam and when I run out of that I used apricot jam. The next layer would be some very thinly slice fresh strawberrys, some crème pâtissière and I ended up with strawberry butter cream. I kept doing this till all three layers were filled. These cakes also went into the fridge. 
Now I had time to do some modeling. I wanted to see if I could make Jake from fondant. And I also like Skully, the parrot. For both I found a video which I watched over and over until I could get it right. Jake was very tricky to make since he has lots of parts. Since it took me so much time to make it, I skipped some miner details. Skully was slightly easier to make, but again I had to skip on some details. Both turned out pretty cool. As I didn't had any green fondant, I made a blue and a purple parrot. Since they didn't had the right color I decided to make them Skully's friends. After I had green fondant, I of course made the "real" Skully. 

By this time the cakes were ready to be coated with fondant. For Bucky I used a kilo chocolate fondant (Satin Ice) which was very easy to work with, mixed with one kilo marshmallow fondant. This was too much, I think I ended up only using one kilo. I made the railing, the slight, the windows, the door, the ladder and used yellow fondant for outlining the boat. I also added the number 3 and 5 since that was the boys age.
For the bottom layer of the two tire cake I used some blue fondant. I didn't know what I wanted to make, but since it's a pirate theme cake I thought about making something with and ocean theme. Then I made some waves with different shades of blue. 

Since I still had lots of chocolate fondant left I used some for the top layer as well. No idea what to make there, but I would figure it out on the fly. 
I also carved out two swords (the one Jake uses) and thought I might use them as decoration.
On the day of the party I had all morning to figure out what I wanted to do with the two tire cake. I also had time to add some details on Bucky. Since I had so much room on the back of the boat I added one boy's name. There was no more room for another name so his brother's name went in front of the boat, of course on the side of his age.

I've seen some really fun cakes with octopuses so I wanted to make some also. I made the first one so fast and it was so much fun I decided to make two more. I put the bigger octopus on the boat to cover the seams and to make it more fun I punch out some golden and silver "coins" and sprinkled that around the octopus. Now it seems like he's been dragging or stealing the money.
The other two octopuses went on the bottom of the two tire cake. Also surrounded by coins of course. Then I wanted to make two Skullys. One would be in front of the ship and the other one will be used on the bottom of the two tire cake. They would be different in size as well. The one on the ship is slightly bigger.
To make the ocean more alive I added some coral and some seaweed. At first Skully was on a big raft, but I found out that I didn't had enough room for my second layer so he had to move to a much smaller raft. 
By the time I got to the top layer I didn't had much inspiration. I didn't want to make it to busy since the bottom layer was already very vibrant. I used some chocolate fondant to make wooden planks and used it to surround the cake. I placed the two parrots on top and surround them with golden coins making them guarding the money. Then with Jake's colors (red and white) I made a banner. 
Last minute I decided to turn Skully's friends into pirates as well by giving them a pirate bandanna. I also made tiny tiny little skulls, just like Skully's bandanna. Gotta love the details. 
After I placed this cake on top of the ocean cake I had to make room for Skully. He's now on a very tiny raft with just a bottle to keep him company. 
These cakes were a 3 days project (without much eating or resting) but it was lots of fun. And very satisfying seeing the reaction of the birthday boys and their guests. 

30 May 2015

Schwarzwalder birthday cake

For my moms birthday I wanted to make something nice. For my dad's birthday I made the Oscar cake with an extra layer of panna cotta on the inside. Just to give it a different twist. Initially I wanted to make the same for my mom's birthday, but when I looked online I stumbled on this schwarzwalder cake made by Rudolph van Veen. I knew this had to make this cake. 
First I started with watching the video in which Rudolph shows how to make the cake. Then I went to the store to get the rest of the ingredients I needed.  

After that it was baking time. 

I started with making the cookie dough since this has to be chilled for a bit. This recipe was quite straight forward and all I needed was:
- 300 gr flour
- 200 gr butter
- 100 gr sugar
- 1 egg
oven temperature 180C

I put all the ingredients in a bowl and kneed them till it forms a dough. This dough I put in the fridge to chill.

After that I stared on the chocolate biscuit:
- 250 gr dark chocolate
- 125 gr butter
- 3 eggs separated in yolks and whites
- 125 gr brown sugar
- 80 gr self rising flour
- 50 gr almond powder
oven temperature 200C

I started with melting the chocolate and the butter on a double boiler. Then I whisked the egg yolks with some sugar till fluffy and mixed this into the chocolate. I carefully incorporated the flour and the almond powder in the chocolate mixture. In the meantime I mixed the egg whites with the rest of the sugar till fluffy. To this I incorporated the chocolate and spread the mixture out on a baking tray. I baked it for about 15-20 minutes till the biscuit was fully baked and let it cool.

This recipe was too much for my baking tray resulting in a thick layer of chocolate biscuit. Next time I would half the recipe and half the banking time.

While the biscuit was baking I took the cookie dough out of the fridge and put it in my baking pan. As I didn't want to waste any dough or do anything else with it, my cookie layer was a bit thicker then the recipe called for. Next time I would just half the cookie recipe. I baked the cookie till it was golden. I think it took about 30-40 minutes because it was a thick slice. This also had to be cooled.
For the cherry stuffing I needed:
- 200 ml whipping cream
- 1 tablespoon of sugar
- 130 gr cherries in a jar
- 1 gelatin sheet soaked in water

Because I had more cherries (and again didn't want the rest to go to waste) I doubled the recipe. I made the cherry stuffing twice since the first time the whipped cream didn't turn out the way I wanted to. What I did was whipping up the whipped cream with the sugar, heating up some of the cherry juice, to this I added the cherries and the gelatin and this all I mixed into the whipped cream. As it had to much juice the cream started to curdle and I had to through it all away. 

The second time I added the cherries (without the juice) to the whipped cream first and then slowly incorporated the juice. This gave a slightly better result. Next time I will wait till the gelatin has firm up the cherries and juice mixture first and then incorporate the whole thing with the whipped cream. 
Now it was time to ensemble the interior of the cake. I used a cutter to cut out 3 circles of the chocolate biscuit. As my baking tray was too small I could only get 2 whole circles and 2 half circles. I started with a layer of one whole circle of chocolate biscuit in the cutter. On this I sprinkled some amaretto liquor and I spread a layer of cherry whipped cream. I topped it with another layer of chocolate biscuit. Again another dash of liquor and a layer of cherry whipped cream and I finished with the two half circle of biscuit. Next time I would just use the two half circles for the middle layer, but I didn't know if I would have enough cherry whipped cream so I wanted to use the whole circles first, just in case. 

I placed the cookie on the interior and used a bigger cutter for the outside rim. This rim will be filled with chocolate mouse using this recipe:
- 110 ml milk (I didn't had milk so I used whipping cream instead, which worked just fine)
- 2 egg yolks
- 30 gr sugar
- 180 gr chopped pure chocolate
- 375 gr whipping cream

Actually I used this recipe times 1,5 since I didn't want to end up with not enough mouse. And luckily I did, because I didn't end up with much after using it all. 

I started with heating the milk or in my case the whipping cream. In the meantime I mixed the sugar in the egg yolks and to this I add a splash of warm whipping cream to avoid lumps. The egg mixture went into the rest of the warm whipping cream till the mixture was as thick as custard. Then I took the pan of the stove and mixed in the chocolate. While this mixture cools I started with whipping up the rest of the whipping cream. I poured the chocolate mixture into the whipped cream and mixed it till the chocolate is fully incorporated. I poured the mouse in a zip lock bag and after I took the cutter off my chocolate biscuit I piped the mousse all around the interior. Unfortunately my interior was slightly higher then the outer rim so my cake looked slightly different then the original. After everything was covered with the mouse I put the cake in the freezer.

The next day I made the chocolate glaze using the same recipe as the one from the Oscar cake"
- 280 ml water
- 360 gr sugar
- 260 gr whipping cream
- 120 gr cocoa powder ( I only had 100 gr, which also worked)
- 6 gelatin sheets soaked in water

I put all the ingredients in a pan and cooked it till it was ready. Then I added the gelatin and let it cool till about 40C.
I took the cake out of the freezer and start pouring the glaze all over starting with the rim. After the cake was covered I put it on a cake stand and held it on my lap while we drove to my mom's. Although it was an hour drive the cake was still frozen when she tried to cut it. I guess with a cake this big it needs at least two or three hours to defrost. The rest of the family couldn't wait so they digged in. Frozen or not it was a great birthday cake. Normally I would test a recipe first before making it for "real" so for a first timer it wasn't bad at all. Next time it would be much easier and faster to make this cake and I'm sure I will be making lots of them. It was that good!