Showing posts with label whipping cream. Show all posts

26 October 2014

Forest fruit buttermilk panna cotta

I have the easiest buttermilk panna cotta recipe ever! It's also the best, but I don't want to brag. For something so tasty it is surprisingly easy to make. Although I've made it several times I never put down the recipe or made pictures so today is the day. 

I put some of my findings at the end of this post so make sure you read it all before you try it yourself.
This is the panna cotta I made for a dinner party yesterday. The fruit color has soaked down  to the white creamy panna cotta giving it a very pretty pink shade.

This is my to got to recipe for about 4 ramakins just as the one you see in the picture. It can easily be doubled or tripled or multiplied by any factor you want. The basis recipe is:
- 200 ml whipping cream
- 200 ml forest fruit buttermilk
- 2 big tablespoons of sugar
- 2 sheets of gelatin (about 3 grams)
- vanilla sugar or a drop of vanilla paste
- pinch of salt (optional)

First I soaked the gelatin in a bit of cold water so they soften.

Then I head up the whipping cream with the sugar. When the sugar dissolves I add the vanilla sugar/paste and the salt. The whipping cream just has to be hot, so it doesn't have to boil. Normally when the sugar dissolves the whipping cream is hot enough. 

I get the sheets of gelatin out of the water and mix them with the whipping cream. Then the buttermilk gets mixed in and the panna cotta mixture is good to go.
I poured the mixture in the ramekins and cover them with some plastic wrap before they go in to the fridge to set. It just needs a couple of hours so if you make this in the morning you can serve it for dessert in the evening. 

To make it extra special I made a topping to go with the panna cotta. I always have some frozen forest fruits in my freezer and they pair just perfect.

What you need for the fruit layer is:
- frozen forest fruit (or any other fruit you like)
- some sugar
- bit of lemon/lime juice
- 1 soaked sheet of gelatin (about 1,5 grams)

I know this is a bit vague, but basically you will need to extract about 200 ml of juice.

So I headed up the fruit together with the sugar and lemon juice and I adapted the flavor to my liking. If I want it a bit sweeter I add some more sugar. If it needs a bit more freshness I add some more lemon juice. Some like it sweet and some like it tart so there is no right or wrong there.

Then I strained the fruit to just get the juice. I need 200 ml juice and to this I mixed in the gelatin sheet. If the fruit juice cooled down to much you will have to heat it up a bit otherwise the gelatin will not dissolve. 

When the panna cotta is set (enough) I poured the fruit juice on top and again it has to sit in the fridge till it sets. 
I noticed that with this ratio of whipping cream, buttermilk and gelatin you will get the most silky smooth panna cotta that just melts in your mouth. 

I haven't tried this recipe with normal buttermilk, but if you do then you might need to add some more sugar to the whipping cream. The forest fruit buttermilk is already a bit sweet so that's why only 2 tablespoons of sugar is enough.

Also I haven't made this recipe with gelatin powder, but if I would I think I would let it soak in a bit of cold buttermilk first. For the same results the amount of ingredients needs to be the same.

27 September 2014

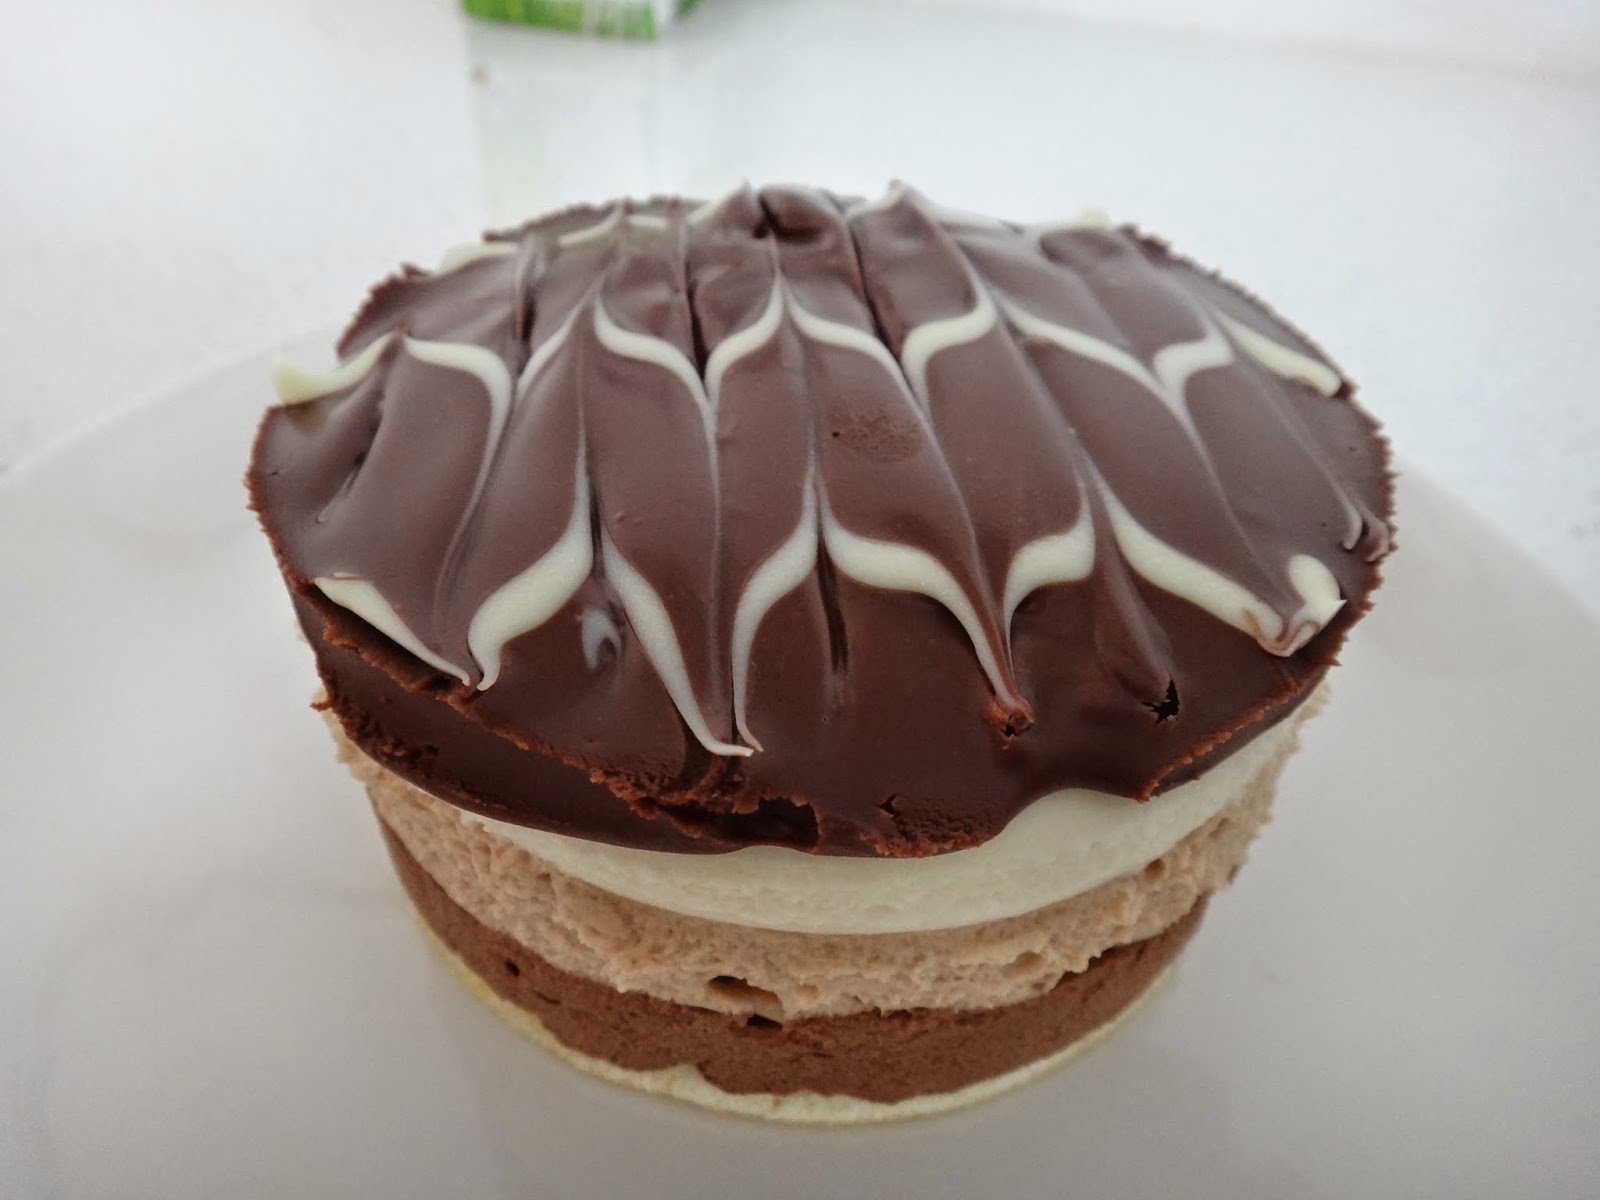
Decadent triple chocolate mousse

The end of the first phase was marked with a big bang. Here I was thinking that we would be making a chocolate cake. Turned out we made a very decadent triple chocolate mousse cake.

We started with making a biscuit like batter for the bottom of the cake:
- 2 eggs 
- 2 egg yolks
- 2 egg whites
- 100 gr sugar
-  55 gr flour

Just as with the biscuit batter we started with warming the 2 eggs and the 2 egg yolks with about 80 grams of sugar. When it reached about 40C we mixed it on high speed till the color changed to almost white. Then we slowly incorporated the flour.

In a different bowl we beat the egg whites with the rest of the sugar till they form soft peaks. We added the egg whites directly to the egg yolk batter and it was very hard to incorporate it. Next time we should mix a bit of egg yolk with the egg whites first to loosen it up a bit and then mix the rest in. Luckily it went well and we spread a thin layer of batter on the, with baking paper covered, baking tray. We baked it for about 6 minutes till golden.


After we took the biscuit out of the oven we sprinkled a thin layer of fine sugar on the bottom of another tray, flipped the biscuit and slowly pulled off the baking paper. If we would leave it on the baking tray the biscuit would continue to cook and dry out. Now we had a nice and flexible biscuit. We left it cooling off while we started with the chocolate mousse.

This chocolate mousse only has 2 ingredients: chocolate (of course) and whipping cream. I've made chocolate mousse at home before but somehow this chocolate mousse tasted much better. It must be the chocolate they used.

All we did was whipping up the cream, just till it thickens and then incorporate the chocolate. So we added the chocolate to the whipped cream and not the other way around. If we would add the whipped cream to the chocolate it would become hard and not mousse like at all. So always add the chocolate to the whipped cream!

We started with a layer of pure chocolate, then milk chocolate and last the white chocolate and if that wasn't decadent enough we topped it off with some chocolate ganache.
It was extremely difficult to make neat identical layers of mousse because we made one batch for 2 cakes and the mall we used wasn't see through so we had no idea how it would look like. I know it looked a bit messy, but the flavor was awesome and the whole family enjoyed it.
We even had enough mousse for a mini triple chocolate mousse cake. The mini cakes were too die for and enough for two, if one of the two doesn't like chocolate that is.
From the left over biscuit we formed a log which we filled with mocha whipped cream and topped with some shaved almonds. We had some ganache left so we spread a thin layer on the inside before putting whipped cream in. It almost look like a real log, a real tasty log.
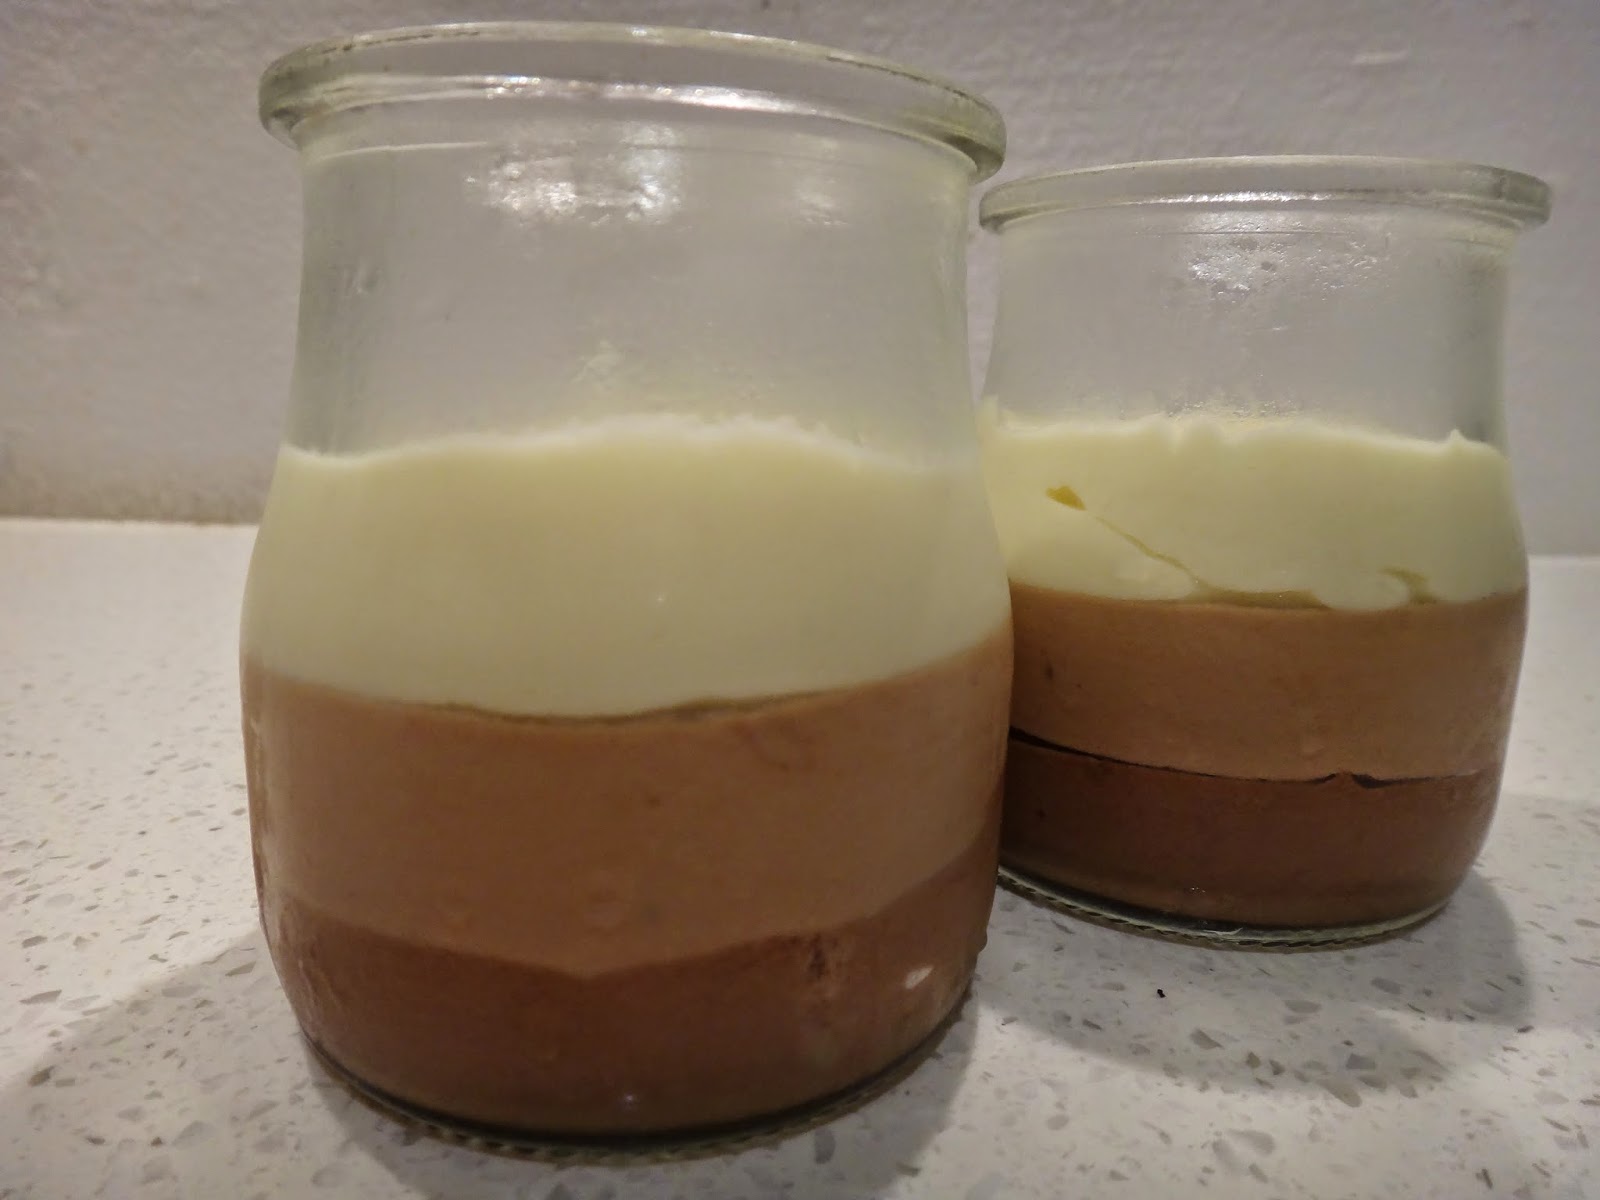
At home I made triple chocolate mousse in a jar. As I only made enough for 3 mini jars I didn't bother making the biscuit bottom.

I used:                                                              For one chocolate mousse cake:
- 30 gr pure chocolate                                      - 150 gr pure chocolate
- 40 gr whipping cream                                     - 200 gr whipping cream

- 35 gr milk chocolate                                       - 175 gr milk chocolate
- 40 gr whipping cream                                     - 200 gr whipping cream

- 40 gr white chocolate                                     - 200 gr white chocolate
- 40 gr whipping cream                                     - 200 whipping cream

Of course this recipe can be double or tripled. 

After each layer I would put the jars in the freezer so they could get firm enough for the next layer. After the last layer I covered them with plastic foil and kept them in the freezer. They were the perfect 4 o'clock work break snack.

Next week: the chocolate saga continues, 5 weeks long...

20 September 2014

Biscuit deeg

|'ve been searching for half an hour for the English name of this particular cake batter that we made in class this week but only found the France name: Biscuit de Savoie. In Dutch we call it "biscuit deeg" and it's a cake batter made with eggs, sugar and flour. It's super light and ideal for any stuffing, frosting, icing; basically it's a great basis for any cake (occasion).

I will start at the beginning. This week we made a "Hema" cake. Hema is a well known sort of department store in Holland that sells pretty much everything. They also have their own cake and pie section. If we had to describe a Hema cake or pie the first thing comes in mind is a cake filled with whipped cream or mocha cream and decorated with nougatine on the sides. And that was exactly what we were making. 
Also we were taught how to make Italian meringue which can be use as a base for butter cream.

We started with making the batter for the dough. We used:
- 200 gr eggs
- 100 gr sugar
- 100 gr flour
- pinch of salt
- lemon zest
Baking temperature 170C.

For a light dough it was important to heat the sugar and the eggs to 40C, then bead it on high speed till the batter turned very pale yellow, almost white, and last to gently fold in the flour, trying to keep as much air in as possible. Since this dough doesn't have any rising agents, the eggs are the ones keeping it airy.

The cake is ready when you don't leave any finger prints in the middle of the cake and it sort of bounces back on your touch.  

After a long cooling period (the cake has to be completely cooled) it was time for decorating. As we each made a cake we could make either a whipped cream cake, a mocha cake or both. I decided to do half whipped cream and half mocha, getting the best of both.

The mocha cream wasn't made with butter cream with some coffee added to it, but with something they called "patiecream". It's somewhat like whipping cream, but not made with dairy so it couldn't be called whipping cream. I've never heard of this before, but it was great stuff. So many possibilities as we could whip it up with anything we liked in it without ruing it. It was great for filling and decorating the cakes.

The cake wasn't high enough for three layers so I kept it simple and only cut the cake in half. On the first half I spread a thin layer of strawberry jam, but only on half of the cake because the other half would be mocha and I didn't think strawberry would go that nice with mocha. Then I added some thinly sliced fresh strawberries on the jam layer for some extra flavor and freshness. I piped some mocha on the other half of the cake and didn't bother even it out because the other layer of cake would come on top. To the strawberry layer I added some whipped cream to level it to the mocha layer. Then the cake layer was placed on top. I marked the cakes with an incision so I knew how to put both half back in the right place. I spread some mocha on top and side of the mocha half and whipped cream on the other half covering the whole thing. Then I pressed the nougatine on the sides covering it all.
 And this was the end result.
For the mocha part I didn't want to make rosettes. So I though I would just pipe it on and see how that goes. Unfortunately it looks less pretty then I thought so I gave it a try with the whipped cream part.
It looked much better. But both sides tasted great. I had a huge slice for lunch the day after.

For the Italian meringue we had to heat up sugar syrup (225 gram sugar and 85 gram water) to 121C and slowly add that to 100 gram egg whites that we already beaten up a bit with 75 gram sugar. After quite some time the mixing bowl cooled down and the mixture was light and shiny. We didn't want to make butter cream so we didn't add the butter. Instead we piped little meringue buttons and baked them in the oven on 90C. This was to keep it white and slowly dry them out.
These were the little buttons we baked in class. I filled them with some butter cream at home making it a nice mini treat.

It was great learning how to make the cake batter and it was much simpler than I thought. This would be my to go for cake batter for any cake. 
Another eye opener was the "patiecream". I can't wait to experiment more with this.
The Italian meringue is a bit tricky since the sugar syrup has to be on 121C and I don't have a candy thermometer at home. I'm sure there are other ways to make this.

Next week: chocolate pie!

07 September 2014

Choux pastry

The second day in class we talked about choux pastry. Choux pastry is a light half cooked dough made with water, butter, flour and eggs. There is no rising agent so basically what makes it rise is a combination of high temperature and steam.

We used choix pastry for making profiteroles and eclairs. I have made profiteroles before and sometimes they rise and sometimes they don't. And I never knew what went wrong. For something that only has 4 ingredients it's still a bit tricky to make. Too many eggs and the profiteroles will rise too much and crack. If the dough is not cooked enough, it doesn't produce enough gluten to hold everything together. If it's baked in the oven on high temperature too long the outside will burn while the inside is still not cooked.

The trick of getting it right is to carefully weigh all the ingredients, cook the dough till it's shiny, add just enough eggs to make a batter and turn the oven lower after the dough has puffed till it can't puff no more. Even then it's not easy to get it right.

In class we had to work in pairs to make the dough. Everything went well till we added the last egg. That last egg did it. It made the batter thin and because we couldn't fix it we baked it anyway. With a pastry bag we piped some piles for profiteroles and some for eclairs. The profiteroles and eclairs came out huge. Huge and flat, because I turned the oven temperature lower too early. So we learned 2 things that day. Too much egg is bad and not letting the dough rise enough is bad.

In the afternoon we learned how to make crème patisserie. Crème patisserie is just a fancy word for pastry creme and it's basically a thick custard. After cooling it we mixed it together with some whipped cream so we could stuff our profiteroles and eclairs.

We didn't want to dip our profiteroles and eclairs in chocolate because that would make them too sweet. Instead we just decorated it with a bit of chocolate.
Our profiteroles and eclairs might not look pretty, but they tasted pretty good. 

At home I tried to make the dough again, this time using half the recipe we use in class:
- 250 ml water
- 125 gr butter
- 125 gr flour
- 4 small eggs (or as much as needed)
oven temperature 225C Celsius till they don't puff up anymore then 175C

I cut the butter in small cubes and started cooking them in the water. After the butter melted I took the pan of the stove and stirred in all the flour. Then the pan went on the stove again and I cooked the dough till I could see a small layer of fat (the melted butter) on it. The pan went off the stove again and I mixed in one egg at the time. First the dough is lumpy and doesn't want to form a batter but by the time I got to the forth egg the dough had the right consistency.
I put all the dough in a pastry bag and start pipping the piles for profiteroles and eclairs on baking paper. I tried to make them all the same size so they could cook the same.

I baked them till they were nice an puffed and took one out to check the inside. Since the inside wasn't cooked I lower the temperature to 175C Celsius and let them cook for a bit longer. I don't mentioned any time because every oven is different and it also depend on the size of the profiteroles and eclairs. Bottom line is: I start with 225C and after they are done rising (and if they aren't cooked in the inside) I turn the temperature down to 175C so the inside can cook.

I didn't had enough ingredients for the crème patisserie so I made a different stuffing. While the profiteroles and eclairs were cooling down I whipped up 200ml whipping cream. Instead of putting sugar in the whipping cream I added 1,5 tablespoons of homemade lemon curd. I figured that they were going to be sweet enough with a chocolate topping anyway. 
I used a scissor to make a little hole in the bottom of the profiteroles and I used a pastry bag to fill them. I did the same with the eclairs. After that I dipped them in some melted chocolate.
These look like proper profiteroles.
Piping skills on the eclair can be better, so there is definitely room for improvement.